Friday

Favorites: Creative Storage

Now that the hubby said yes and the turtle is in the garage I have a WHOLE closet for just the exact purpose I wanted it for- a closet office. I tried so hard to get that darn turtle out of there and now it's out and I have no idea where to start. I want to do it once and I want to do it right the first time. As usual I have little $$ to complete my project so I need all the ideas I can get. Pinterest here I come! 


A french drain pipe makes for excellent yarn storage over at Sew Many Ways. Thes little cubbies could be used for all sorts of things- paint brushes, pipe cleaners, pencils, markers, rulers...you name it! 


Martha Stewart does it again, using tension rods as spacers. What a wonderful way to think outside the box.


Candace at She's Crafty was inspired by an article by Better Homes and Gardens to use spice racks for wrapping paper storage. 


I love this idea from Southern Living for hiding your less used items and that the drawers pull out on sliders. This would be great for my Cricut and my printer. It would also consume most of my office budget. :(  Maybe I can find a way around it or I can save up for it later. On the up side it would probably be cheaper to make than a file cabinet!


Re-Nest featured this office space. If you look closely you can see that it it made with simple, easy to change shelving. Unless I can find something completely genius to up-cycle shelving is going be my biggest expense. Knowing how much I change things up this shelving seems like the way to go. Plus it's relatively cheap! You don't have to  buy fancy to make it look nice.


Wednesday

Savoring the Sun

You've heard me complaining about how short the summers are here in Alaska and this year promises not to disappoint. The leaves are dropping, changing colors, and light jackets getting pretty common. We are trying our best to savor the good snow-free day we have left before the sun is gone.


I hope you all are enjoying all the sun for me where ever you are! 

Tuesday

He Said "Yes!"

It took a few weeks but I finally got my the hubby on board with giving the turtle the boot to the garage! Wahoo!!!! 
 Now instead of this: 


I have this WHOLE space to work with:

Yeah, that darn air freshener is STILL there!!! LOL. 

It's going to be some work getting the hose out of the wall.  (Thanks Hubby)


And the tacks? All I can say is we didn't put them there. 


I am SO excited about this! It is going to be an amazing space, I just know it.

Friday

Favorites: Office Nooks

I REALLY want to turn the current turtle housing into an office. Now one thing you have to know is that Fred, the turtle, is not an option. There are possibilities that I may have to will this turtle to someone on my death bed. However I do not think Fred really cares if she is inside or in the garage. It's heated AND turtles hibernate! Tell that to the hubby though. Fred is his baby. So, though I have been eating away at him slowly and have grandiose plans of one day reclaiming this closet for now I have to dream. Gotta be ready when I finally crack him you know ;)


Over at Great Balancing Act  they did quite a bit of work to pull off this simple little desk space. I love that the color scheme here is made completely by the accessories. How easy would it be to change this up?


My Home Ideas  shares this little office space. The built in organizers rock my world! That is until I realize a few months later that I can't change them up at all :(  The idea of putting your books/magazines in bins to make them look tidier is good thinking.


This sweet little set up from Wimages  is the.most.adorable. Look at all that space! Who would have thought to add a sweet little sitting spot in there too? 


Martha thinks outside of the box closet here and packs a workstation into an armoire! The peg board from my current office will be coming with me. I like how the little trash can is the same color as to blend with the background and not stick out.

Whew! All that inspiration and I am ready to go! 

Oh.. Hubby.... Where are you?...

Wednesday

A cabin Getaway

 For Labor Day weekend we FINALLY got a chance to visit the family cabin. This was the first time this year! I'd say the visit was long over due. 


Right next to the cabin is a river. The dogs think this is the best place in the whole wide world. They jump off the cliff and swim though the river after sticks all day long. 


My favorite thing to do is to sit by the fire place and read a book. I read a whole cheesy romance novel in three days. It was glorious! 


The kids favorite part was making Smores, partly because this was Anberlynn's first time getting to hold the skewer in the fire. Evelyn enjoyed eating them as fast as Anber could make them!


The whole cabin has lots of family history and personality. I chuckle to myself every time I see the  burl over the out house door that is shaped like butt cheeks.


If you have a cabin near you I highly recommend a good get away. State Parks often have cabins to rent for pretty cheap or even free with reservations. So pack up the Smores and some blankets and spend a night away from all the technology and business of daily life. I know it's done wonders for me!


Sunday

$14

While I was out at that conference I mentioned before I got a call from the Hubby. Well, a text message actually. It was a picture of some chests at a yards sale. Immediately I jumped on it! I was in love with the 1 inch by 1 inch photo he sent me from the second I opened it! Wanna see what he picked up for $14?


This trunk was $5! Five dollars!!!!! I wanted to use it as a coffee table at first but then I found  a name and a place on the left hand side. aA far as I can tell from some research this trunk belonged to Roy Koffel and it could be pretty close to 100 years old!!!! No way am I taking a chance at spilling kool-aid on this puppy.


I haven't had any chance to do the research on these guys yet but hey have all kinds of shipping labels and thing on them. Sorry about the fuzzy pic, the kiddo started to wake up so I had to click and run. I find it interesting that they fit perfectly into the door frame that we are trying to hide.  I don't think I really like it but for now it covers up most of it. 


And last but not least this metal beauty. It is perfect for the end of the bed. the girls use it to climb up into the bed. Unfortunately there isn't any tell tale signs like names, places, or dates on this one.  


All that for $14 It gives our bedroom so much more of a warm, broken-in feeling. Even Lexi thinks so! 

Friday

Favorites: Plan A

If you missed my post on Plan A you can read it here. This weeks favorites is going to be on home inspiration that I think will actually work with my house. 


This glass tile back splash from Bedrock Industries would look lovely in my kitchen. Right now my kitchen has a wooden wanna-be back splash that is only a few inches tall. These colors would mesh perfectly with the teals and greens I use and still celebrate the dark browns.


This living room from Pottery Barn is one of the few I found that actually had wood trim. I like how everything is neutral but they pulled that teal rug in there for a little pop of color. Mission: find/make/paint teal rug. 


This one is also from Pottery Barn. I love the vintage details they have going on here and how that round but simple mirror softens everything up. The layered pillows pull int he color pallet of my house. Guess I will be buying fabric to make some new pillow cases. 


This living room from mydesignideas.com  is neutral, celebrates the wood around it, is full of texture and still manages to be a nice cheery space. I think that is my biggest fear- that if I embrace the wood it will turn into some  big dark hole. This proves me wrong.


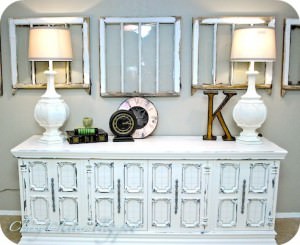
Tip Junkie shared this picture of a white buffet. Hey, wait a minute. I have a white buffet! 
the chipped windows, vintage clocks, and wooden letter make this space classic and light at the same time. That is do-able in my book. 

Have great inspiration photos that embrace wood and neutrals? I would love to see them!

Monday

Brilliant

Remember that Favorites post about folding your sheets into their own pillow cases (here) and how I thought that was an absolutely brilliant idea? You probably thought that was common sense but I just don't think of things like that. This is going to be another post like that. 

Well ,I was sitting at a totally non-decor related meeting this weekend when something that the speaker said rocked my little struggling to design mind. I forgot the exact quote/speaker but what it translated to in my mind was this:

Plan A was to make my house a home (decor wise).
Plan B: To be able to afford Plan A. 
Plan C: Throw a little style into Plan A and cover up the cheapness of what I actually could afford.
Plan D: To be able to afford Plan A + C
.
.
.
Plan H: All the crap furniture is falling apart, I have no style, I am doomed. It is going to look like this forever.

By now I'm getting a little depressed. "The Plan" Is making it's way through the alphabet and I'm struggling to come up with a Plan I, when I stumble onto the idea of refinishing and finding hidden potential in trash bins. 

Plan J: Thrift my way into bliss.
Plan K: I have a ton of stuff and I'm going to make this work!!!
.
.
.
Plan N: I have a ton  of stuff. I'm on Plan Freakin' M and this is not working out. I'll start using Pinterest to define my style. I'll have endless possibilities and instant inspiration and links to thrifty websites!
Plan O: Paint EVERYTHING White. It is the constant in my inspiration photos. Next Hardwood floors! There are no carpeted rooms in my inspiration photos. Then, invest in beach-y curtains and canopy beds.
Plan P: Be able to afford Plan O.
.
.
.
As you can tell this is not going well. Unless I pretty much take my house apart, paint EVERY single piece of trim, molding, stair railing and door surface, get new flooring for the ENTIRE house, toss out my most expensive furniture, enlarge all of my windows, and dig up my back yard and replace it with the whole ocean (the blue kind, not the silty kind like here in Alaska) then this is NOT GOING TO HAPPEN. 

Here's the thing. I have been coming up with SO many plans that hadn't worked and all along Plan A was the Key.  I just had to think about it differently. Instead of:

Make my house a home (decor wise).

I needed to be malleable and think of my home. It should have been read like this:

Make MY HOUSE a home (decor wise).

I could try six ways from Sunday to make this house into my every whim and unless I was going to come up with the $ to tear down my house and completely rebuild another one my "ocean breeze, teal and purest of whites, vintage cottage home" style that I wanted so bad, that I tried so hard for was not going to jive with my 80's-built, blackout-curtain-necessary, off-white-wall-and-carpet, builders-grade, cheap-wood-loving house. EVERYTHING about my house is wrong, wrong, wrong for that. The house itself is built for Alaska. The functions of this house have to meet Alaska standards. Last time I checked blackouts curtains don't "billow," it's more like watching a moose breath in and out. 

So. My NEW and improved plan is:

Plan A!!!!

Make MY HOUSE a home (decor wise).

Brilliant.

Now, that doesn't mean that I have to abandon all of my hopes and dreams. it just means that the super modern IKEA desk is not going to play well with my builder's grade, 80's brown color trim and since the trim is ALL over the house. The desk is what will have to go.

I am so excited to try this new outlook on my home! The hubs found some GREAT things this weekend that are SO me AND they are SO MY HOUSE too. 

*sigh of relief*

Glad we got that all worked out. 

Friday

Favorites: Kid Edition


Try this little project to cool your kiddos jets. It is a "Mind Jar" Shake it up and cool off as the glitter falls. Use it as a timer if you have time outs! 


Organize the zillion little kids art projects you have hanging around your house and scan your photos into you computer or a kiosk and have them made into a book!


Want to share all the joys of painting with your kids but having a hard time justifying the mess? Try this tip on recycled coffee or slushy cups!


Check out this site on instructions on how to make your own DIY Light table!!! 


Check out his great idea for a quick and easy magnetic surface with an oil drip pan!


Tuesday

Autumn Wreath

I was searching through Pinterest the other day when I found this inspirational tip from The Penny Parlor!


It is a piece of pipe insulation that you can buy at the hardware store. On her blog she said that she was able to get 6 feet of it for 96 cents! Here it was just over a dollar but compared to a wreath form from the craft store it's still a steal!!! 

Next I searched for some inspiration on burlap wreaths and here's some of my favorites:


I have my burlap, my cheap foam wreath form, and some inspiration. Now to get started!

I cut my pipe insulation to the size I needed. I tried to just tape up the ends of the tube like she did but I found that it just folded in half. To give it more stability I stuffed my tube with the classifieds. It worked pretty well.  Then I taped my ends together with the only tape I had on hand.


You know pink zebra striped duct tape is awesome! *wink* 

Then I glued down some left over burlap with one frayed end sticking out. 


Next is on to the flowers. I just bought a bunch of fall flowers for 40% off and pulled them off the stems.


So pretty.


And that's it. 


I hung it on my door. 
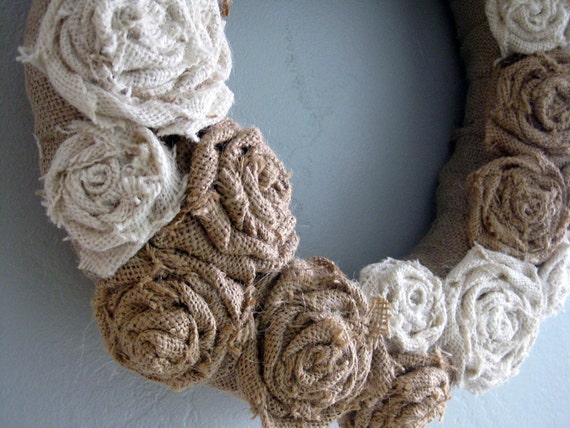

I might move it and put it off to the side of my door like I have done in the past because I'm not really excited about having a wreath in front of the window.  

Total cost:

Burlap: left overs- free
Flowers:  $3. 40
Pipe Insulation: $ 1.16 

I only use half of the insulation so I will use that for my next wreath project and I still have about half of the flowers left too! Hm... what else needs some Fall spirit around here...

Linking up to: 


Sunday

So remember this pic of my downstairs bathroom? See that BIG wooden board attached to the back of the towel bar? Some of you may have guessed that that was not a good sign already. I had my suspicions but I was hoping for the best. 


No such luck. 


The hole on the left is small enough to fix with a little compound but the other one I think will at LEAST  need a patch with some of that patch fabric stuff. 

And speaking of patches...


See the one in the bedroom? It is exactly the size of a knee cap. Ask me how I know. You can see we have all the stuff  to fix it, this one including a dry wall plug, knock down, and more paint. 

Oh, you are also seeing a peek at the ceiling fan that we've had for 3 YEARS!!! Hopefully that will go up soon too. For now we are enjoying our Labor Day weekend out at the family cabin, away from all the DIY awaiting us here at home.